
Windows Server 2022 is the latest version of Microsoft’s server operating system, providing a robust, secure, and scalable environment for managing IT infrastructure, network resources, and services. In this article, we will introduce the process of How To install windows server 2022 , from initial preparation to completing the installation.
Prerequisites for Installing Windows Server 2022
Before beginning the installation, ensure that your hardware meets the minimum system requirements for Windows Server 2022. These include:
- Processor: 1.4 GHz 64-bit processor (2 or more cores).
- RAM: 512 MB minimum; 2 GB or more recommended.
- Disk space: 32 GB or more.
- Network Adapter: Ethernet adapter compatible with IPv4 or IPv6.
- Graphics: Super VGA (800 x 600) or higher resolution.
- Bootable media: USB drive, DVD, or ISO image for installation.
- You also need a valid product key for activation, which can be obtained from Microsoft or your licensed distributor.
| What Is a Central Processing Unit? | What Is RAM (Random Access Memory)? |
| Understanding Types Of Graphics Cards (GPU) | Digital Versatile Disc |
| Network Interface Card (NIC) | What Is A Graphics Card? |
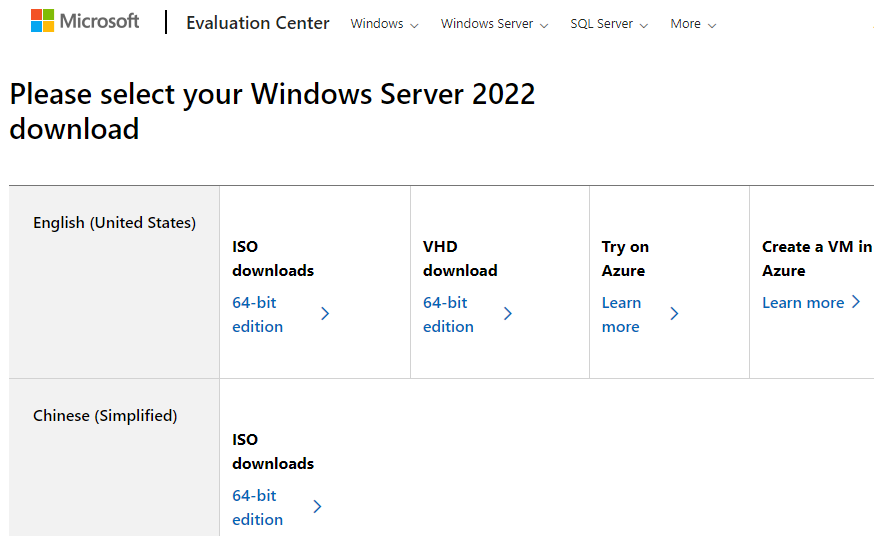
Download Windows Server 2022 ISO File
To start the installation process, you first need to download the Windows Server 2022 ISO file from the official Microsoft website. Follow these steps:
- Visit the Microsoft Windows Server download page.
- Choose the desired edition (e.g., Standard or Datacenter) and download the ISO file.
- Make sure you have a valid product key ready, as you will be asked to enter it during installation.
Create Bootable Installation Media
Once you have the ISO file, you need to create bootable installation media. You can use a USB drive or a DVD. We will focus on the USB drive method:
- Insert a USB drive (at least 8 GB in size) into your computer.
- Use the Windows Media Creation Tool or a third-party tool like Rufus to create a bootable USB drive.
- For Rufus, select your USB drive, choose the Windows Server 2022 ISO file, and click Start.
- Wait for the process to complete, which may take several minutes.
- Once the bootable USB drive is ready, you’re all set to begin the installation on your server or computer.
Related Articles: What Is USB (Universal Serial Bus)? Types, Features, And Uses
Boot from the Installation Media
To install Windows Server 2022, you need to boot your computer from the USB drive or DVD. Follow these steps:
- Insert the bootable USB drive into the server or machine where you want to install Windows Server 2022.
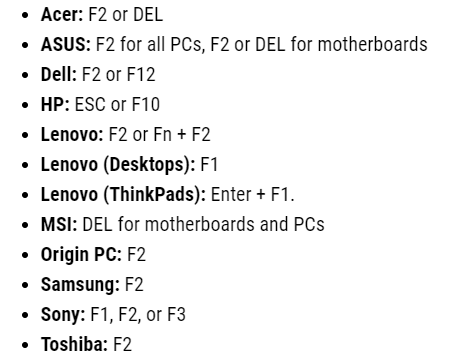
- Power on or restart the machine and access the BIOS/UEFI settings by pressing the appropriate key (usually F2, F12, ESC, or DEL) during startup.
- In the BIOS/UEFI menu, change the boot order so that the USB drive is set as the primary boot device.
- Save and exit the BIOS settings.
- Your system should now boot from the USB drive, and you will see the Windows Server 2022 installation screen.
To go to the system’s BIOS, the hotkey of each brand may be different, which you can find out from the brand manufacturing website. Below you can see the hotkey to go to the bios of some motherboard brands.
Start the Installation Process
If your ISO file was correct, no error occurred while creating bootable USB, which means that the USB bootable media has been created successfully, and the port to which the USB media is connected is working properly. The below screen will be displayed in your system. In which you will be asked to press any key from the keyboard, which confirms that you want to install the installation script from CD/DVD or USB in the system.

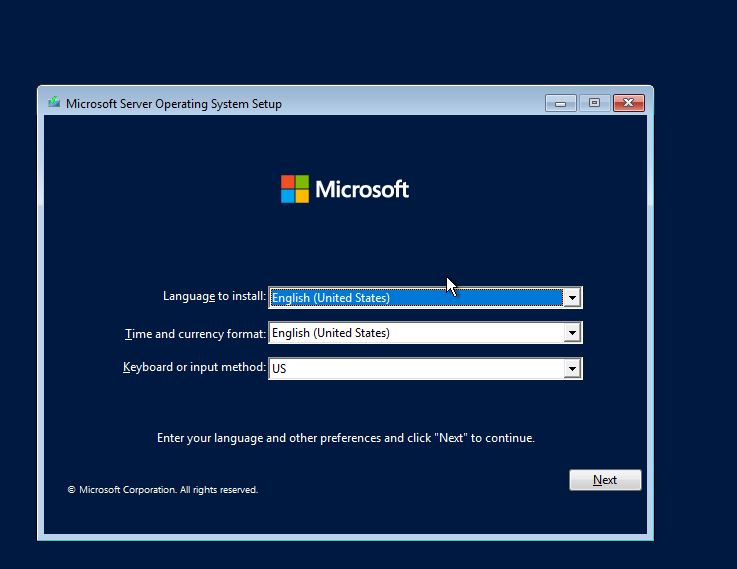
Now that your computer is booting from the installation media, follow these steps: choose the language according to your needs for the installation of windows server 2022. By default English, (United State) language are selected, but you can change it accordingly and click on Next to continue the installation.
- On the first screen, select your language, time and currency format, and keyboard layout.
- Click Next to continue.
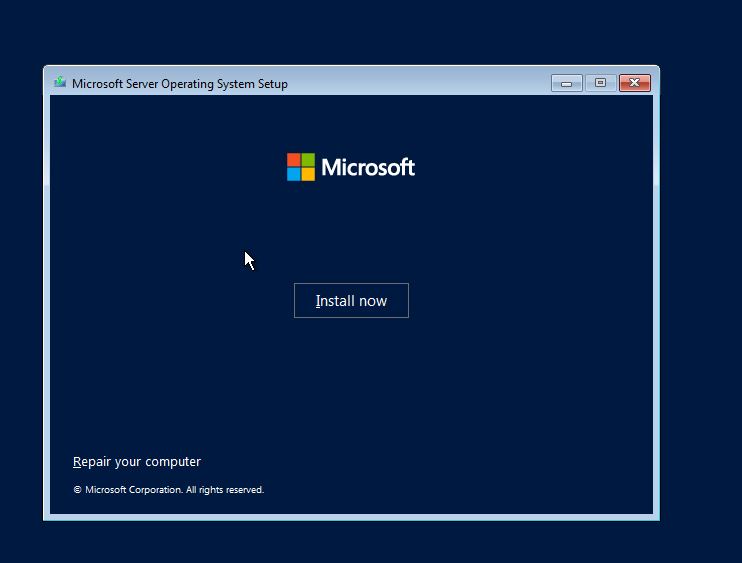
- Click on “Install Now” shown on the below screen to begin the installation process of windows server 2022.
Enter the Product Key
At this point, Windows Server 2022 will prompt you to enter a valid product key. Enter the product key you obtained earlier and click Next. If you do not have a product key at this moment, you can skip this step by clicking “I don’t have a product key.” You will be asked to activate it later.
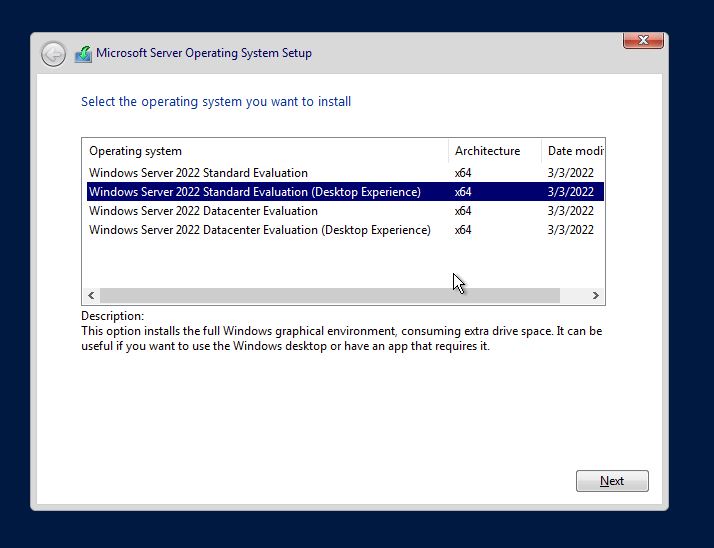
Select the Installation Edition
On the screen below, you will see the available editions of Windows Server 2022. Select the edition that best meets your requirements. The Standard edition is ideal for most businesses, while the Datacenter edition is designed for larger organizations needing advanced features like virtualization. In this example, we have chosen the Windows Server 2022 Desktop Experience, which includes the Windows GUI and other related tools. After making your selection, click Next to proceed with the installation.
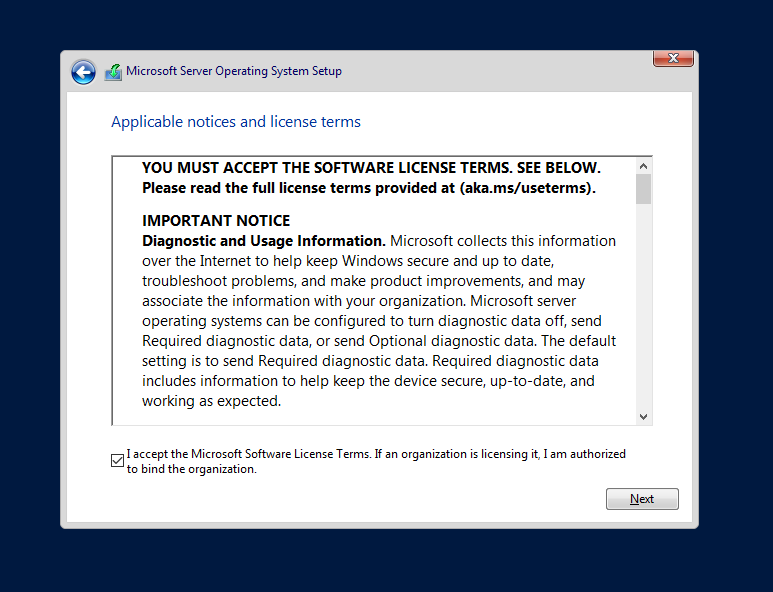
Accept the License Terms
You will be asked to review and accept the license terms. Read through the terms and check the box indicating that you agree to the terms. After that, click Next to proceed.
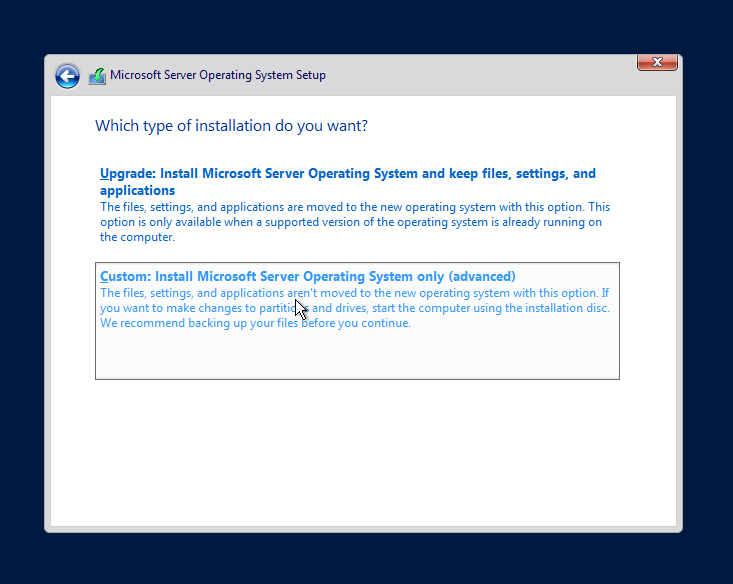
Choose the Installation Type
On the screen below, you will see two options: Upgrade and Custom. Choose the option based on your server’s requirements.
- Select Upgrade if your system already has a previous Windows operating system installed, such as Windows Server 2019, and you want to upgrade to Windows Server 2022.
- Choose Custom Install if you are installing Windows Server 2022 on a new server without any previous operating system.
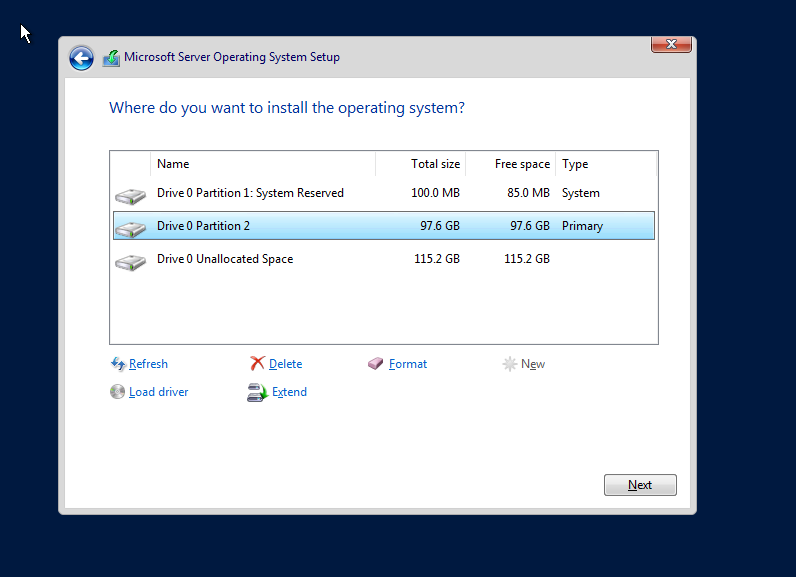
Choose the Installation Drive
The next screen will show you a list of available drives and partitions. If the system has multiple drives or partitions, select the one where you want to install Windows Server 2022. If the disk is not partitioned, you can create a new partition. Here are the steps:
- Select the unallocated space (or the drive where you want to install).
- Click Next. Windows will automatically format the drive and prepare it for installation.
If you have an existing operating system on the drive, it will be replaced by the new installation.
In this example, we have created a 100 GB partition for installation. You can adjust the number and size of partitions as needed. To create a new partition, click the New option shown on the screen. Then, click Next to continue with the installation.
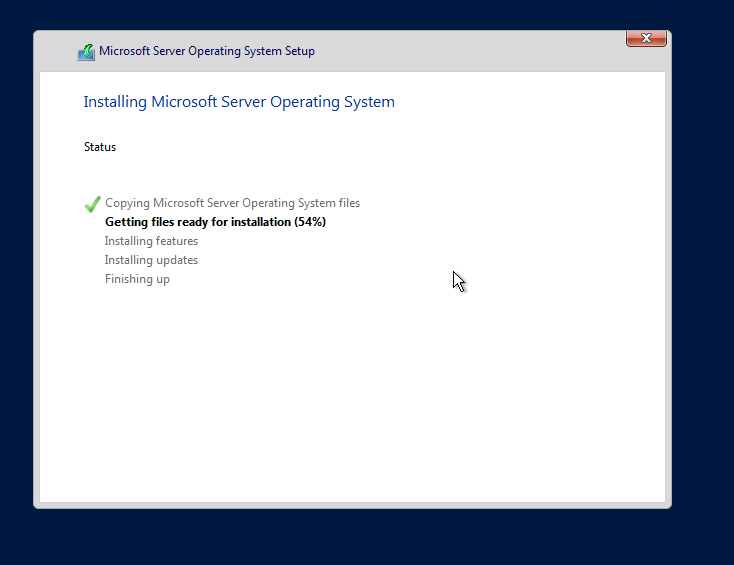
Wait for the Installation to Complete
At this point, Windows Server 2022 will begin copying files, installing features, and configuring the system. This process may take some time, depending on the speed of your hardware. The server will restart several times during the installation. during the os installation system will be starting 1-3 times so don’t worry.
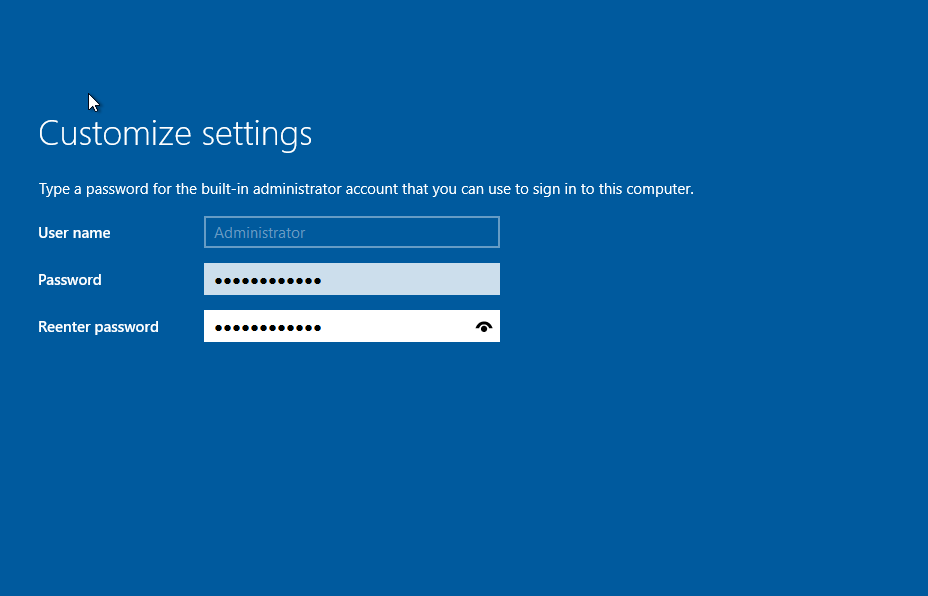
Set the Administrator Password
Once the installation is complete, you will be prompted to set an Administrator password. This password will be used to log in to the server after installation. Ensure that the password is strong and meets the security requirements (e.g., minimum length, complexity). After entering the password, click Finish.
Finalize the Configuration
After the system restarts, you will be presented with the Windows Server 2022 login screen. Enter the password you set for the Administrator account and log in.

After the operating system installation is complete, the Windows Server 2022 login screen will appear. To log in, press Ctrl + Alt + Delete on your keyboard. To log in to the server, you will enter the administrator password that was set at the time of OS installation.
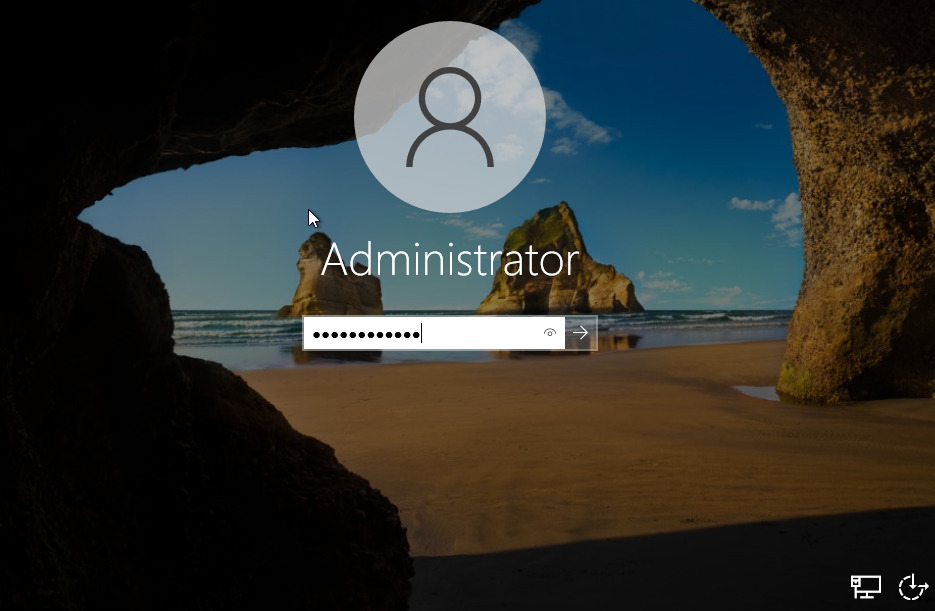
The screen below shows the login screen of Windows Server 2022. After successful installation of Windows, you can configure it according to your company and institute requirements.
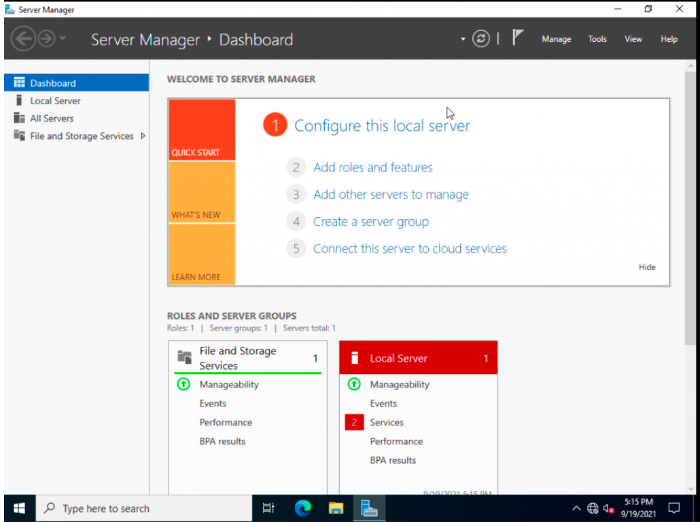
Initial Configuration of Windows Server 2022
Once logged in, Windows Server 2022 may take you through an initial setup wizard for network and system configuration. You may need to:
- Set the server name: The default name is usually “Server” followed by a number (e.g., “Server01”). You can rename it by going to the Server Manager.
- Configure the network settings: If your server is connected to a network, configure the IP address, DNS, and other network settings.
- Activate Windows: If you skipped entering the product key earlier, activate your server by navigating to Settings > Update & Security > Activation.
- Install Updates: It is highly recommended to install the latest updates and patches from Microsoft to ensure your server is secure and up to date.
Install Server Roles and Features
After completing the basic configuration, you can now install the roles and features that your server will support. Windows Server 2022 includes a variety of roles such as:
- Active Directory Domain Services (AD DS)
- DNS Server
- Web Server (IIS)
- File and Storage Services
- Hyper-V (for virtualization)
You can install these roles via Server Manager by selecting Add roles and features and following the wizard.
Set Up Remote Desktop and Other Services
If you need remote access to your server, enable Remote Desktop by going to System Properties > Remote Settings and selecting Allow remote connections. You can also configure additional services such as DNS, DHCP, or Active Directory based on your organization’s needs.
Back Up the Server
It’s always a good idea to back up your server after installation. Use the built-in Windows Server Backup tool or third-party backup software to create an initial backup of your system.
Conclusion
Congratulations! You have successfully installed Windows Server 2022. From here, you can configure and deploy additional services, set up security measures, and optimize your server for your specific needs. Regular updates and monitoring will help ensure that your server runs smoothly and securely for years to come.
Recommended Articles
- Windows Commands Every User Should Know

- 15 Essential Things to Do After Installing Windows 10
- How To Change IP Address Windows 10 Using Different Methods
- How to Install and Configure Windows Server 2022
- What Is Cache Memory? Types, Functions & Limitations
- CMD vs. PowerShell: Understanding the Key Differences
- What is Microsoft Windows? Features, Functions, And Benefits
- What Is Spyware? Definition, Types And How to Protect System
- What Is Virtual Memory? How It Works And Why It’s Important


